I had to change both wheel bearings, brake rotors and brake parts on the front of my Mahindra Pik Up as part of it’s 128k Service and WOF.
Parts required
Look at this beautiful catalogue!
We needed these parts:
- 6 - 0603AAB00310N - DISC & TONER WHEEL ASSY FRT LH
- 11 - 0503CA0070N - BEARING ASSY OUTER (check cheaper alternative)
- 15 - 0503CAA01050N - OIL SEAL FRONT HUB
- 22 - 0503CA0050N - BEARING ASSY-INNER CUP & CONE (check cheaper alternative)
- 6 - 0603AAB00320N - DISC &TONER WHEEL ASSY FRT RH
Alternative Bearings
Thanks to Plimmerton Motors, we found some cheaper options for bearings with similar quality.
- Outer Wheel bearing - Part number: LM501349/10 - Specs
- Inner Wheel bearing - Part numbeR: 25590/20 - Specs
My cost for the set was around 115.00 NZD against 240.00 from Mahindra. And you can find them cheaper if buying them directly.
Inner seal
When changing the bearings you also need to change your inner seal (Oil Seal Front Hub), you need to buy these from Mahindra. You can find more about it on Where to find spare parts Mahindra Pik Up in New Zealand.
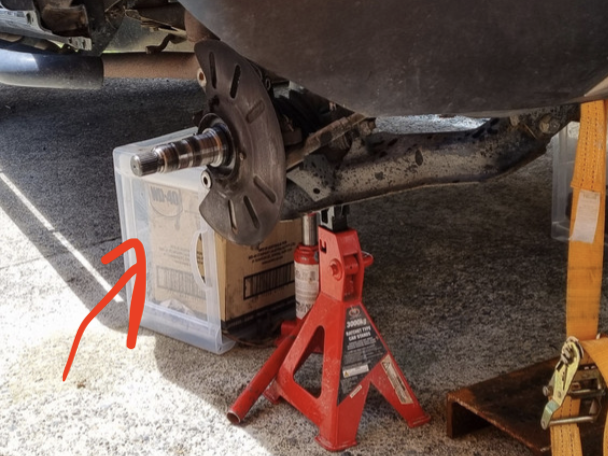
The actual Job
Remove Brake Calliper
There are two screws in the back of it (the big ones). Mine was tight as hell and I had to use some tightening straps to force it out.
Get a box or something high enough to rest the calliper on top, so you don’t force your break lines.
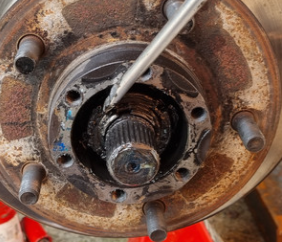
Replacing the old bearings
Tip time!
Use gloves to reduce the mess, and get a small container to put all the parts in. I also take pictures of every step so I don’t forget how to put them back
Related parts:
- 16 - AUTOMATIC HUB LOCK ASSEMBLY
- 26 - CIRCLIP CVJOINT
- 12 - LOCKNUT OUTER
- 20 - LOCK WASHER
- 23 - SPRING LOCK WASHER M10
- 9 - LOCK NUT & LOCK PIN ASSEMBLY
Easy to remove, a bit messy though.
- Remove Auto Locking hubs (16), there are some tips at Mahindra - Replacing Auto to Manual Locking Hubs, easy as just 6 bolts using a HEX key. Mine were tight as hell.
- Remove the Circlip (26) - I actually have a circlip remover tool, which make thing easier, but you can use a screw driver to take it out as well.
- Remove sprint lock washer (23) - just there, you take it out with your hand
- Remove Locknut outer (12) - I used a hammer and a screw driver, there are notches were you can rest the screw driver, rotating it as you tap with a hammer
- Remove Lockwasher (20) - a bit fiddly, but you can take it out with a screw driver
- Remove the inner lock nut (9), this is the one that has a pin were the lockwasher locks it in place. Same as locknut outer, tapping a happer on a screw driver
- The front bearing will just fall out
- Remove the hub from the axle
- Remove the oil seal (15) from the hub - I used a seal remover, but you can remove with a screw driver. It gets damaged and you need to change this
- Now, with a hammer and a metal rod you need to remove both cones from inside the hub. This was harder than I expected, smash it out! Be aware, there are grooves inside of the hub that allow you to rest the metal on the bearing cone.
- You may be able to change the bearings without changing those, but that’s not advised
That’s it, all disassembled.
You then need to pack your bearings with high temperature bearing grease, messy but not hard to do at home. I did it before when working on the Safari, but this time Logan used their bearing packing tool at Plimmerton Motors.
Video teaching how to pack a bearing: https://www.youtube.com/watch?v=UywlK7VQIRE
You will also need to put the new bearing cones on each side of the hub. Logan did that for me as well, but according to them, you get a puncher (I don’t have one), which is a piece of metal, and you slowly tap it in until it rests at the right spot.
With that, it’s reassemble time. (I replaced my brake rotor at this time as well)
To assemble, you follow the disassemble steps in a reverse order.
Tip 1
To easily check if your bearing is tight enough, you can put the tire on and with that you can rock it form top to bottom. Thanks Frank!!
Add some Blue Loctite to the outer lucknut
My brother has a Mahindra back in Brazil, and he told me to add Blue Loctite to the outer nut that keeps the locknut in place. That way, it doesn’t come loose by itself. The nut that I’m takling about, is the first one you remove, and the last one you put back.
Replace brake rotor
You already removed everything, when the hub is out, you have 6 bolts that you can easily remove and replace the rotor. Easy as…
Replace Brake pads
No secrets here as well, take them off, add the new ones in place. There are some metal bits that you can swap as well.
Replace left inner and outer tie rod (Bonus find)
When I finished everything, my left wheel was still with a vertical play, which was diagnosed with a faulty tie rod! 😠😅

So I ordered them from Mahindra, I wanted to change both sides, but they didn’t have the right one on stock and it would take up to 6 weeks to arrive 🙅♀️. (Come on Mahindra, you can do better than that!)
I didn’t take much pictures, changing was way harder than necessary because I tried to put it back from top to bottom instead of bottom to top… hookie mistake! Don’t do that! Just don’t… 🤣
This video from CrisFix explains a lot: https://www.youtube.com/watch?v=05XOhz67jGA
Total cost
Roughy 1400 NZD on parts, plus 100 of labour, some cuts here and there (you need to pay the mechanic bill with your own blood and sweat).
I like to lie to me that I saved 1000 bucks doing all of this work. I did learn a lot tough!
Special Thanks
I had heaps of help from Frank and Logan from Plimmerton Motors. Thanks guys.
Also Nigel from Northland Mahindra helped out sorting the parts out.